The Claas CEBIS is a console that is present on some Claas machines. This terminal supports UT (Universal Terminal) functionality, but does not support TC (Task Controller). Simply put, it is a screen that can manage ISOBUS tools, but cannot manage tasks, guide lines, modulation maps, fields etc.
We recommend the use of CEBIS with a MyEasyConnect box, so that you can take advantage of the CT integrated in MyEasyConnect to manage the cut-off and flow variation automatically.
MyEasyConnect exchanges isoxml data, and makes it possible to send a recommendation to the tractor, or to send back isoxml information when a job is finished.
This documentation will talk about the possible configurations on CEBIS in a first part and in a second part of the task management part, thanks to MyEasyConnect.
1. Management of CEBIS
Switch to ISO Terminal mode and reach the MyEasyConnect screen
- Slide your finger to the left to change the working phase and reach the "ISO Terminal" (1).
- The ISOBUS tool can be managed by CEBIS, it appears in position (2), (3) or (4). The MyEasyConnect box also appears here. If it is not visible, click on the arrows (5) until you reach the MyEasyConnect management screen.

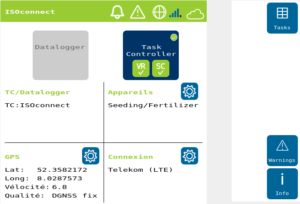
- A screen like the one below should appear
2. Importing a task (in a connected way)
On the PC
Export the task online via "Agrirouter" using the "MyEasyConnect" endpoint. See the MyEasyFarm User Guide, "Export the map/task directly to your tractor console," pp. 13–14.
On the "MyEasyConnect" screen,
- Click on "Task Controller" to activate MyEasyConnect as a task controller for the equipment
- Click on the tasks tab

- Select the desired task in the list (the task sent by Agrirouter must have been imported automatically).
- Click on Start

3. Section break and modulation management
- Click on the Products button

- The page below appears:

- Select the desired product(s)
- Click on the Work tab
- A page like the one below appears:

- This page allows you to view the real time status of the sections and the flow rate of the machine. If the section break and variable flow are active, the SC and VR logos are in green.
- With the "Override" button active, the spread rate specified by the user in the adjacent input field is used instead of the task value. As long as the override is active, a green tick appears in the button and an "M" appears in a red circle in the status bar.
- The colorimetry of the sections changes in different ways:
| Red | The section is deactivated. Nothing will be spread |
| Green | The section is active. The specified spread rate is spread |
| Blue | The section is active. The spread rate differs from the majority of the sections. This occurs if the ISOBUS spreading device supports the variable area rate functionality. |
- To reset the coverage already in place, click on "Coverage Clear".

- Confirm your choice by clicking on

4. Exporting a task
From the Home tab ![]() ,
,
- Click on the tasks tab

- Select the current task.
- Click on Stop
 .
. - MyEasyConnect will propose to send the intervention data back to the Cloud. Then click on
 to automatically resubmit the task to MyEasyFarm.
 - If the task is sent, it disappears from the MyEasyConnect task list.
If the task has not been exported,
- Click on the Sync tab


5. Miscellaneous settings MyEasyConnect
Necessary equipment
- dGPS antenna, to be connected to the RS 232 socket of the MyEasyConnect box
- Console with UT option (like CEBIS)
- An Agrirouter account and a SIM card for data connection (provided by default for 3 years when purchasing MyEasyConnect).
Login to Agrirouter
- On the computer, connect to your my-agrirouter account
- Click on "Dashboard".
- Click on

- Select "MyEasyConnect
- A registration code will appear as below

- On the CEBIS console, click on the tab
 in the "Login" section.
 - You will arrive on the page below

- Click on the "Cloud ID / TAN" checkbox.
- Enter the registration code proposed by Agrirouter
- Wait a few moments
- The connection will be effective when the Cloud key changes from the icon to .
- Once the connection has been made, click on
 .
.
Connecting the GPS antenna.
- Connect the GPS antenna with an RS 232 socket (see diagram opposite).
- On the CEBIS console, click on the tab
 in the "GPS" section
 - The page below is displayed

- Select the "Seriel" option
- Configure the antenna location with the distance information at the bottom of the page.
- In the " GPS Data " box: Select GPS RAPID UPDATE PGN if your antenna is compatible in 5 Hz frequency, otherwise for a 1 Hz antenna, select GPS POSITION DATA PGN.
Configure ISOBUS tool geometry
- On the CEBIS console, click on the tab
 in the "Devices" section.
 - Click on the tab
 after the name of the hardware connected to the ISOBUS network.
 - The page below is displayed

- Selecting the tool attachment
- Click on in order to reach the tool configurations. Below is an example of a seed drill:

- The doses can be recommended by the MyEasyConnect box if no application card is inserted. To do this, you must enter the values in the ISOconnect box. The overlap defines the cut-off strategy of the sections :