1. Configuration
Prerequisite for automatic dose modulation :
The command center 4 terminal must have premium activation and be connected to a starfire antenna.
2. Importing a card
On your PC (if you use a USB stick) :
- Download your map/task from the platform
- Insert on the key
- Before importing your recommendation card into the usb key, extract the .SHP, .DBF, .SHX files from the recommendation file (.zip).
- Create a folder called "Rx" (be sure to respect upper case), then insert the files in it (as below)
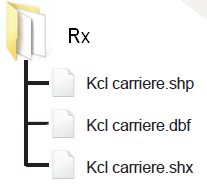
- You can insert several modulation cards in the same Rx file.
- Unplug your USB flash drive
On your PC (if you are using the MTG JD Link box) :
- On MyEasyFarm, export your map to John Deere Operation Center and select the farm to which you want to send your map.

- Then go to the "Files" tab in MyJohnDeere (https://files.deere.com), select the card to be transferred to your tractor, then click on "Transfer to accessory".


On your console (if you use the USB key) :
- Insert the USB key in the pillar at the rear right of the cab.

- Once the key is inserted, a window appears, click on " import data",
If the key is not recognized
- if the window does not appear automatically, click on menu

- Click on System

- Click on Data Manager to import the prescription.

- Click on import from a usb key then click on next

- Click on the file using the checkbox on the left side of the folder and then click on next.

- Select the Rx Prescription and click on Import.

- Click ok once the data has been successfully imported.

- Click on the cross at the top left to exit the import menu.

On your console (if you use MyJohnDeere) :
- Click on menu
- Click on System
- Click on Data Manager to import the prescription.
- Click on import files received then click on next

- Click on the file using the checkbox on the left side of the folder and then click on next.
- Select the Rx Prescription and click on Import.
- Click ok once the data has been successfully imported.
- Click on the cross at the top left to exit the import menu.
Import the prescription (regardless of the method used)
- Click again on menu

- Press application

- Check that the implement, boom section control, customer, farm and plot are set up correctly before selecting the modulation map.

- Once your plot and your equipment have been set up correctly, click on the icon further down on the left to create a new task on this plot.

- Click on ok

- Set the type of operation, and products, then click on target dose/Rx to select the dose control

- Click on the round button next to Rx to select your modulation file.

- Select the desired file then click on ok

- Click on ok

- Click on the density column to select the density/quantity provided.

- Select the column containing the recommendation then click on ok

- Select the unit corresponding to the recommendation

- Indicate a seeding rate to be applied in case of loss of GPS signal (your usual input/density).
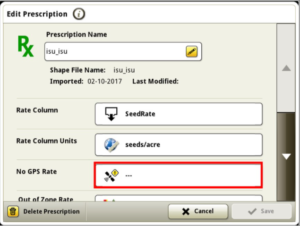
- The same applies to areas of the parcel that may be outside the recommendation map.

- Assign the corresponding plot to your modulation map

- Once this information is set up, click on save.

- Visualize your modulation map and its parameters then click ok.

- Click on ok to validate the parameters

Set up your tool
- Click on the ISOBUS VT icon to set up the virtual terminal of your tool

- If the virtual terminal does not appear, press the menu at the bottom right of the screen.

- Select your tool then click on ok

- to apply your modulation map, you must use the density option 6, select the density icon

- click on show densities

- Click on change densities

- Select density

- Click on density 6

- Click on the On/Off menu

- Click on On and then on ok

- Click on next to view doses

- Density 6 indicates a density Rx, i.e. prescription

- press the tool icon to return to its menu

- Click on the target dose icon

- Select Rx density (density 6)

- Density now displays an Rx icon

- Make sure the auto mode is on

- then go to the guide menu

- Click on the icon with the two rotating arrows.

- Click on the settings icon

- It is possible to change the parameters of the layer applied in the background

3. Export data to MyEasyFarm
The greenstar 4 console exports in proprietary format by default. ISOXML unlocking is possible, but you must ask your dealer for details. Without this unlocking, it is necessary to forward the files through MyJohnDeere, Operation Center.
On the console (if you use the USB key) :
- Insert the USB key in the pillar at the rear right of the cab.

- Once the key is inserted, a window appears, click on " import data",
If the key is not recognized
- if the window does not appear automatically, click on menu

- Click on System

- Click on Data Manager

- Click on the EXPORT tab, then click on Export all data to a USB stick.

On the console (if using the MTG JD Link box) :
- Click on Menu
- Click on System
- Click on Data Manager
- Click on the EXPORT tab, then on "Custom export".

- Select the " MyJohnDeere Operations Center"tab

- Now select the data to be exported.
On the computer (if you use a USB stick):
* If you use the MTG JD Link device, the files will be uploaded directly to your MyEasyFarm account
- Plug in the USB flash drive
- Login to the MyJohnDeere site
- Click on
 and then on the "File Manager" tab.
  (https://files.deere.com)
- Load the file by clicking on

- Select the corresponding folder and the files inside. The operation will be visible as below:

- The files are then transferred to MyEasyFarm the Operation Center integration